Today we will look at how to store henna and how to make
henna cone to get those beautiful designs…

How to Store Henna?

Keep fresh henna powder or henna paste
in the freezer. It can be stored in a plastic applicator bottle or in cones and
it should be sealed well. Wrap tightly to protect from light and moisture. Henna
is perishable, so protect it from heat and light. Once opened, try to use it within
6-12 months for best results.
How to Mix Henna Paste?
1. Henna should be mixed 24 hours prior to use to get the
best results. Get the below mentioned ingredients ready. Mix these ingredients
into a fine paste and put it in a zip lock bag.
20 grams
packet of mehndi
1.5 teaspoons sugar
1/4 cup fresh lemon juice
1.5 teaspoons of essential Oils used to mix henna
2. Watchfully mix the ingredients in the bag. Now continue
to carefully mix the paste by massaging the bag until all the lumps are removed.
3. Keep the bag of henna paste in a warm place for 24 hours
(on 70 to 80 degrees Fahrenheit).
4. After 24 hours has passed, open one small corner of the
bag and fill your applicator bottle or the henna cone.
5. Now make beautiful henna body art!
6. Keep the leftover henna paste in the freezer to be used
another time.
Not sure how to fill the storage carrot bag? Do
not worry; here is how it is made…

1.
Inside a tall glass place a large
zip lock bag or storage carrot bag.
2.
Next step is to fold the top edge
over the glass (Just as shown in the second image) so that it will stand up
straight and will not collapse.
3.
Now pour the prepared mehndi paste
into the bag.
4. Completely lock the bag by twisting
the tail 1 or 2 full twists above the filled portion.
5. Close the bag with a knot or small rubber
band. Then cut about 1/4 inch or preferably less off the tip of the storage
carrot bag to fill the cones or applicator bottles.
Now get the cone
ready to make the designs…

Gather cones, henna,
a narrow glass, and rubber bands/tape.

Make
several cones stand in the glass until there are enough cones that they support
themselves. Then make sure the center cone stays upright to be filled with
henna.

Now insert
the storage carrot bag that is filled with henna down into the center cone and
squeeze in henna paste gently.

Fill the cone about
half to 3/4’ths full of the cone. Be watchful not to overfill the cone.
Points to
remember: Try to keep the sides of the cone clean. Ensure the paste does not
get to the edge of the cone making it a mess.
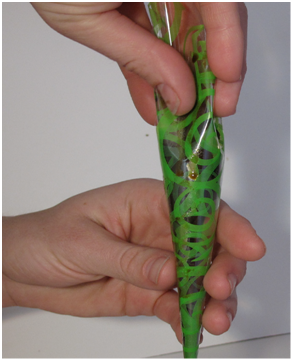
Now take hold of the
end of the cone and squeeze it together the excess, empty Mylar.

Squeeze the empty end/tail
tightly. To tightly seal the cone, squeeze and twist the Mylar. Be careful not
to let any mehndi paste squeeze up to the end of the tail.

Seal the
cone with a small rubber band. Ensue to wrap the rubber band on multiple times
to ensure the cone is completely sealed and no mehndi explodes out while you make
your designs.
As you use
up the paste, keep sliding the rubber band down to maintain full pressure in
the cone.
Now you are
all set to make your own mehndi designs!
No comments:
Post a Comment